

Are you looking for an alternative to dragging a hose and sprinkler around your property? Want to save water and time when caring for your garden or landscape? Installing a drip irrigation system can do all this—and more!
Why use drip irrigation?
Drip systems can be up to 95 percent efficient, meaning that 95 percent of the water in the system reaches the plants. Because water is applied directly to the plants, less water is lost to evaporation, potentially resulting in significant water savings. The ability to automate also reduces plant (and operator) stress.
Drip systems are highly adaptable and suitable for both small and large plantings. They can be used for everything from trees and shrubs to ornamental gardens and even potted plants!
Components of drip irrigation systems
It is easy to be intimidated by the large variety of components available for drip irrigation. But once you understand the basics, all the other options are merely enhancements.
All drip irrigation components are designed to work at specific water pressures for optimum performance. Before starting, or if adding new components, ensure all components are designed to operate at the same pressure.
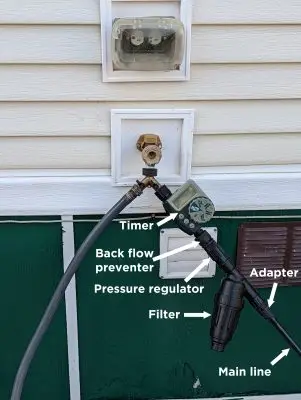
At the source
The drip system begins at the spigot or hydrant. The following components are essential to the proper function and safety of the system.
Backflow preventer: keeps water in the drip system from flowing backward and contaminating the water source.
Pressure regulator: regulates the pressure for optimal performance.
Screen filter: filters the water to prevent clogging of the small drip emitters by debris (typically 150 to 200 mesh is recommended).
Adapter: allows the attachment of the main line.
Main line
The main line delivers the water to the planting area. It is typically ½-inch or ¾-inch poly pipe, although PVC pipe can also be used. Be sure not to exceed the manufacturer’s recommendation on maximum length, as this can result in pressure loss and poor performance.
Emitters
Different sizes of emitters deliver water at different rates. Typical outputs are ½ gallon per hour (gph), 1 gph, or 2 gph. Emitters are typically color coded, but not all companies follow the same color code. Pay attention to the fine print!
Emitters can be placed anywhere along the main line where water is desired. You can also purchase drip tape or drip tubing, which have emitters already built in, most commonly at intervals of 8 to 24 inches. Pressure-compensating emitters can also be used to minimize the effect of changes in topography.
Connectors and Valves
These components connect the main line and drip tape or tubing together. They come in a variety of shapes, including T-shape, elbow, straight, and 4-way. Goof plugs, for holes made inadvertently, are also available (let’s face it, none of us are perfect). Valves are used to turn off a line when not in use.
End plug
For the system to pressurize properly, the ends of the lines must be plugged. Note that it is still important to be able to open the end for flushing the system. Use an end plug that can be unscrewed or a figure 8 hose closure.
Tools of the Trade
As with any project, having the right tools makes the job easier. Basic tools include pipe cutters, a hole punch to make holes for the emitters or connectors, and stakes to hold the line in place.

Designing your drip irrigation system
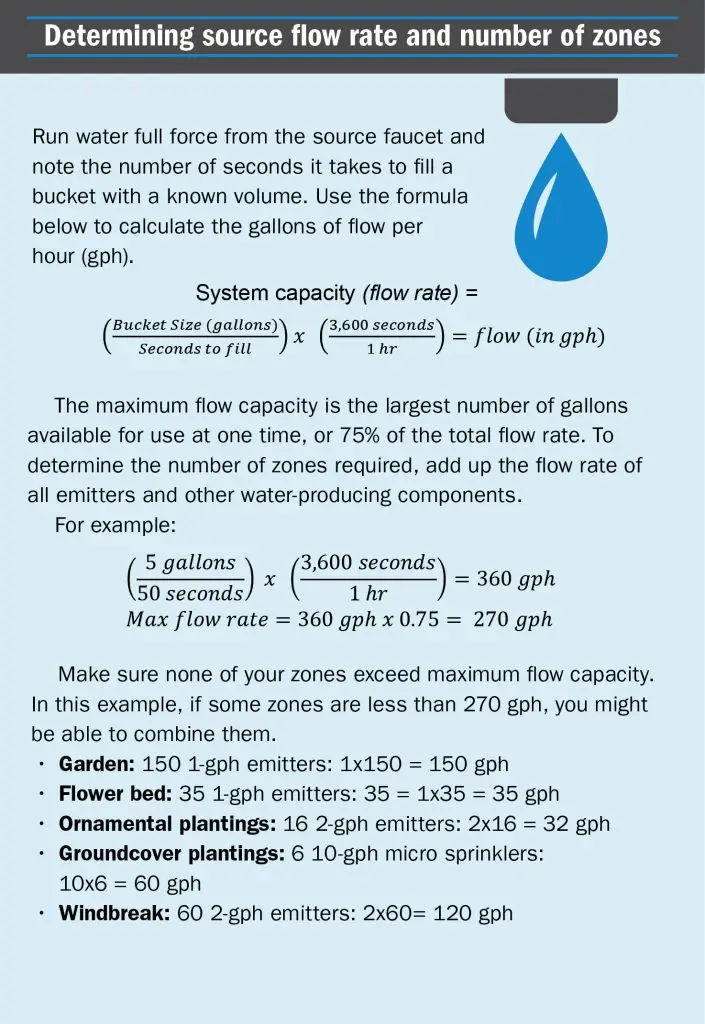
How much water do you have? See the next page for steps to determine your maximum flow rate. This is the largest number of gallons available for use at one time and will tell you how many zones you need. Zones are typically divided by location or plant type. For example, the garden, the tree row, and the flower bed could be different zones.
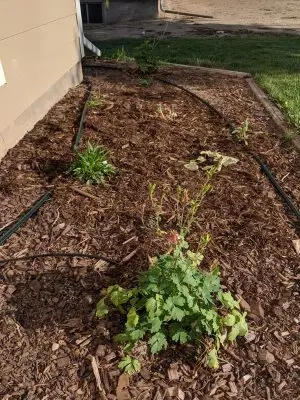
Next, determine how much main line you need to provide water to the plants. For tree rows and perennial beds, emitters can be plugged directly into the main line next to each plant. Note that one emitter is often not sufficient for meeting a tree’s needs, especially as it grows. Emitters should also be moved away from the trunk and into the root zone as the tree grows and matures.
Use drip tubing with an emitter on the end to place directly beside smaller plants. For dense plantings, use drip tape or drip tubing with built-in emitters. Make sure to choose drip and emitter spacing that matches your plant spacing.
A drip system provides unrivaled flexibility because the main line location and emitter placement can be easily adjusted and fine tuned. If needed, more than one emitter can be placed per plant. Emitters of varying sizes can also be used in the same zone.
Drip system maintenance
The most common issues in a drip system are clogged emitters and rodent damage. Make sure to inspect lines and emitters regularly for leaks or clogging. Flush the filter and drip lines at the beginning and end of the season (or more often if necessary). Emitters can become clogged from hard water buildup as well. Replace clogged emitters and damaged lines as needed.
Adding mulch on top of the drip system holds moisture and protects the drip line from the sun, though it can sometimes result in increased rodent damage. Don’t apply more than 2–4 inches of mulch.
How much water?
How long and how often to water depends on soil type, climate, and rooting depth of the plants. To irrigate successfully, you must establish appropriate watering times and frequencies.
To determine proper timing, run your system for 10–15 minutes, then dig down to determine the depth of wetted soil. For most plantings, you should aim to wet the top 6–9 inches of soil, referred to as the root zone. For trees and larger shrubs, aim for 15–18 inches. If the system’s current settings achieve this goal, then no further adjustments are required. If not, run the system again in 5-minute increments and re-check.
The time it takes to wet the root zone determines the length of time required for each watering. Water again when the top 1–2 inches of the soil is dry.
The ball method can also be used to determine appropriate irrigation timing. Make a ball with the soil and bounce it in your hand. If it stays together, there is enough water; if it falls apart, the soil needs irrigation.
Beyond the basics
While drip irrigation may seem complicated, once you understand the components and how they work, designing and operating your own system is simple. For more fun (and to add another level of automation), try using a Wi-Fi or Bluetooth timer. Don’t be afraid to experiment and find what works best for you!
Caleb Carter can confirm that drip irrigation saves time, water, and most importantly, backache. He is district manager for the Weston County Natural Resource District and can be contacted at (307) 746-3264 or ccarter.wcnrd@gmail.com.
Reprinted from our Winter 2023 issue of Barnyards & Backyards magazine.